Recipe: Corn Pasta Salad!

Happy Fourth of July weekend!!!

It’s been a while – guess my latest trend has been one post a year which is pretty lame, I know. :/ Hope you’ve all been doing well!! A super quick update on me: I’m going into my senior year of college (scary) and currently working at my dream internship learning a whole lot about my (hopefully) future career in forensic science and I am loving every second of it!!

A couple weeks ago my mom and I were waiting in the line at Wegman’s (our favorite grocery store with soooo many gluten free options), and we picked up a magazine that had a beeaaautiful picture of a pasta salad on the front. We instantly flipped through the pages to find the recipe and I snapped a picture so we could make it ourselves (that’s allowed right???). Pasta salad is such a Fourth of July staple that we figured this would be the perfect time to make it!! So let’s get into the recipe 🙂

fullsizeoutput_243a

What you’ll need:

  • a pound of gluten free rotini (we used Barilla because that’s my mom’s favorite – my go-to is usually Tinkyada)
  • 1.5 cups frozen shelled edamame (we couldn’t find any shelled so we just bought the ones in the shell and did all the work ourselves)
  • 1 medium zucchini, spiralized and cut to about two inch lengths
  • 2 cups halved grape tomatoes (we only had red but you can use a mix of red and yellow to make it a little more fun)
  • 1.5 cups diced bell pepper (again we only had red but you can spruce it up with some more color!)
  • 1/4 cup chopped basil (or parsley if you prefer)
  • 5 ears of sweet corn, husks and silks removed, cooked
  • 1 clove of garlic (or two if you’re like me and always double the garlic)
  • 1/2 cup of water
  • 3 tbsp lemon juice
  • 2 tsp Dijon mustard
  • salt & pepper to taste

How to make it:

  1. First you’ll want to get your corn cooking since that takes the longest. While that’s cooking, you can get your pasta going and start chopping up your tomatoes, pepper, and basil, spiralizing your zucchini, and shelling all your edamame if you also can’t find shelled edamame. If you do have frozen shelled edamame, the recipe says to toss the edamame into your pasta water in the last two minutes of cooking to defrost them.
  2. To make the creamy corn dressing, cut the corn from 3 slightly cooled ears of cooked cobs and blend that up with the garlic and water until it’s smooth. Press this mixture through a fine-mesh sieve into a bowl and throw away the solids. Whisk together the corn liquid, lemon juice, Dijon, salt, and pepper.
  3. Toss all your pasta, edamame, zucchini, tomatoes, pepper, basil, and the corn from the remaining two cobs in a large bowl (make sure everything is cool by running under cold water), coat with the dressing, and enjoy!!! We finished ours off with a little grated parmesan cheese, too.

fullsizeoutput_243c

This is such a fresh and summery recipe and it’s sooo yummy. Perfect for a meal (you could even throw some protein in it if you want) or as a side for a barbecue!

Hope you guys like this recipe as much as I do and hopefully you’ll be getting more posts from me soon and it won’t take me another year 🙂

Nuts.com Products (and Recipes)!

Hi guys! I was so excited to receive an email from a representative from Nuts.com asking me to tell you all about their great products. They were kind enough to send me a couple of their products to try out (yay free stuff!).

First up, black walnuts!

Now, black walnuts are like regular walnuts, but with a much more unique flavor. They’re also full of great health benefits; they contain more protein per ounce than any other tree nut, and they are very low in saturated fat, and high in polyunsaturated and monounsaturated fats (those are the good ones, they help maintain good cholesterol!). They come shelled and ready to go in the package, and I decided to make some pumpkin muffins and toss some of these in there! (I apologize for the lower quality photos, I forgot to bring my nice camera home so I had to make do with my iPhone camera)

These were really good! We used some pumpkin muffin mix that we got from Trader Joe’s. The muffins were fluffy and moist, and the walnuts provided a great crunch (I also added some chocolate chips, because a little chocolate never hurt anyone right?) I liked the walnuts in the muffins, but be warned, they are a little bit of an acquired taste. I probably wouldn’t eat them by themselves, but the unique flavor works pretty well when you put them in other things.

Next, pine nuts!

I never thought to eat a pine nut on its own, but I tried one and it actually tasted really good! It kind of reminded me of a sunflower seed. They have a great flavor that goes well in any kind of dish, and toasting them brings out even more nutty flavor! Like the black walnuts, these are also high in monounsaturated fats, which are great for heart health. They also contain nutrients that naturally increase energy levels (because who couldn’t use a little energy boost?). Anyway, the first thought that popped into my head for how to use these in a recipe was in pesto. But no, that’s too expected. I had to do something different. I didn’t want to blend them up into a sauce—I wanted to showcase them and their flavor. So I decided on a pasta dish with fresh tomatoes, artichokes, garlic, and basil. Heres the recipe! (Again, low quality pic, sorry 😦 )

Pasta with Tomato, Artichoke, and Pine Nuts

img_0150

What you’ll need:

  • 1 package Tinkyada Brown Rice Spaghetti (or whatever spaghetti you prefer)
  • 1/4 cup olive oil
  • 1/2 cup pine nuts
  • 4 garlic cloves, minced
  • 2 large tomatoes, diced
  • one 8.5oz can of artichokes, drained
  • 1/4 cup chopped fresh basil
  • a little bit of oregano
  • salt and pepper
  • parmesan

How to make it:

  1. Cook pasta according to package directions
  2. Heat oil in a pan over medium heat and sauté the pine nuts and garlic until light brown (I didn’t use all the oil for this step, just enough to toast the nuts and cook the garlic)
  3. Add the rest of the oil, tomatoes, artichokes, basil, and oregano and let it simmer for a little bit, and season with salt and pepper
  4. Toss in the pasta, and serve with grated parmesan

This really was such a delicious, fresh dish, and it allowed you to really taste the pine nuts. I can’t express how much toasting the nuts brings out the nuttiness; it was just so good. I will definitely be adding this recipe to my regular lineup.

Finally, the kind folks at Nuts.com sent me some gluten free snacks to try out. I got roasted chickpeas, veggie chips, and half-popped popcorn.

img_2340

The chickpeas were really really good. I’ve been wanting to give chickpeas a try as a healthier alternative for a snack, and they exceeded my expectations. I’ve been sitting in my dorm snacking on them since I got them. I think they taste kind of like a cross between a peanut and a sunflower seed. It’s great. Some friends on my floor had a little sampling session in the hallway and they liked them too! So the chickpeas have been college student approved. Now the next two snacks were kind of a toss up; I wasn’t sure how I was going to feel about them. I’ll talk about the veggie chips first. I didn’t think I was going to like them that much. Well, correction, I knew I would like the sweet potato chips, I wasn’t sure about the carrots, squash, taro, or green beans. Yes, I said green beans. Someone made green beans into chips. And surprisingly, I liked them. And everything else in it for that matter. They each have a unique flavor, and I really like it. As for the half-popped popcorn, the name is literal—it really is only popped halfway. I was imagining the weird pieces of popcorn that don’t get fully popped when you microwave the bag. But these were not that. They are delightfully crunchy in just the right way. I really enjoyed them! I’m happy to have these great snacks as options for hanging out in my dorm. I might just have to order more when I run out!

I’m so happy that I got to try these products, and a big thank you to Nuts.com for sending them to me! They’re definitely worth a try!

Although I was not paid for this review, I received free samples of Nuts.com products. However, everything I’ve said in this review is my honest opinion and reflects my own personal experiences.

Graduation!

Guess who’s high school’s newest graduate? This girl!

graduation

I’m so happy to finally be done! I am free. I made it. It doesn’t quite feel real yet; it’s still sinking in that I am now a college student, not a high school student. I have New Student Orientation at UDel in less than a week. I keep having to stop and remind myself that this is actually happening and I’m not dreaming!

Anyway, after the graduation ceremony, which was very nice, I was faced with the difficult decision of where we would go for our celebratory dinner. Actually, it wasn’t that difficult—kind of a no-brainer really—Earth Pizza! I got the Four Cheese Sundried pizza, which had their special cheese blend, goat cheese, parmesan, sundried tomatoes, and (extra) roasted garlic. And let me just say, pizza is the best celebration. It was delicious! I also mixed it up and got the Chicken Tenders as an appetizer and those were awesome. But since I’ve already reviewed Earth Pizza and shared my dear love for it, we’re gonna talk about the delicious food we had at my graduation party.

So on Sunday, my family and I had a little party to celebrate with everyone. And obviously the ever important part of having a party is what food to serve. Since we all know I have a  slightly obsessive love for pasta, that is obviously what we had to make! We made penne vodka, which consisted of the two very difficult steps of cooking a bag of Tinkyada penne, and pouring Victoria Vodka Sauce over it. A lot of work, I know. My mom also grilled up some chicken and made a nice little salad to have with it. It all was wonderful!

And now, even more important, dessert! My mom made one of my favorite cakes, Strawberry Shortcake. Strawberry Shortcake always feels so summery and fresh and light to me. And it’s always delicious! For the cake, we used Wegman’s Gluten Free Vanilla Cake Mix. All you need is 4 tablespoons softened butter, a large egg, and 2/3 cups of milk. Then just cream your butter and 1/2 a cup of the cake mix with an electric mixer for about 2 minutes, then add the rest of the cake mix, egg, and milk, and combine it all together.  Then pour it up in the pan of your choosing (we used a big 9×11 pan since we were serving a bunch of people) and bake it for 35-38 minutes in a 350° oven. After the cake is totally cooled, it’s time for the topping! We whipped up our own fresh whipped cream to put on the cake (which is seriously a hundred times better than the stuff in the can). All you have to do is use about 8-10 ounces of heavy cream, about a 1/2 teaspoon of vanilla, and powdered sugar to taste and whip it with an electric mixer. I could literally just eat this all day straight out of the bowl. It’s just heavenly. So after you’ve resisted eating it all before it even hits the surface of the cake, spread it all over the top evenly. Then slice some strawberries and lay them all over on top of the whipped cream!

gluten free strawberry shortcake

Another option for this cake assembly would be to make two smaller round cakes and put them on top of each other with whipped cream and strawberries in between and on top. No matter how you put it together, it’s going to be amazing. I am crazy for this cake. I’m literally eating a leftover slice as I write this. It somehow feels like a healthy version of cake, probably because it’s a little lighter with the whipped cream and fresh strawberries instead of a sweet, heavy frosting.

Overall, I celebrated my graduation with some pretty awesome food. And what better way to celebrate is there than with that? I can’t wait for this next chapter of my life at the University of Delaware. It’s going to be so exciting and new and fantastic! And I am so ready for it. I will now leave you with a picture of my decorated graduation cap that I love. 🙂

graduation cap

Just to let you guys know, next week I will be heading off to Europe for my cruise (YAY), and I’m not sure if I will be able to post anything in that time, so it may be a while til you hear from me next, but I can’t wait to share my stories from the trip!!

Recipe: Spaghetti with White Clam Sauce!

spaghetti with clam sauce

What a surprise, Anna’s writing another recipe post for a pasta dish. I can’t help it, I have a problem. Some part of me must be Italian. That would make a lot of sense. Anyway, one of my favorite meals to order at Italian restaurants is linguine with clam sauce. It just tastes so fresh and delicious. So I decided that I wanted to make it for myself! The flavorful, brothy sauce, the chewy clams, perfectly cooked pasta…soooo delicious! Full disclosure: I got this recipe off the side of a can of Bumble Bee chopped clams and made just a few changes.

What you’ll need:

  • 12 oz brown rice spaghetti
  • two 6.5 oz cans of chopped clams, drained, reserving liquid
  • 2 cloves garlic, finely chopped (I used a garlic press)
  • 1/4 cup olive oil
  • one 8 oz bottle of clam juice
  • 1 tablespoon chopped parsley (plus a little extra for topping if you want)
  • 1/4 teaspoon basil
  • a little bit of pepper to taste
  • shredded or grated parmesan for topping (optional)

How to make it:
spaghetti with clam sauce

  1. Cook your pasta according to the package directions.
  2. In a large pan, heat your oil and add your garlic until brown and tender.
  3. Put your reserved clam liquid, bottle of clam juice, parsley, basil, and pepper in the pan. Bring it to a boil, then reduce the heat and simmer for about 5 minutes.
  4. Add your clams to your pan (these are already cooked so you just have to get them nice and warm).
  5. Toss your cooked and drained pasta in the pan with the sauce, then scoop it into a bowl (make sure you get plenty of that delicious sauce in there!) and top it with as much parmesan and extra parsley as you please!

This was so amazing, and also really simple! We appreciate a quick, easy recipe in my house. My cat also appreciated this meal because it meant she got to eat some clams. This tasted exactly like I was sitting in an authentic Italian restaurant eating dinner. Pair it with your favorite gluten free bread, baguette, or breadstick (I like Chebe’s Breadstick Mix, review coming soon!) to soak up all that delicious sauce and you’re set! 🙂

spaghetti with clam sauce

Recipe: Sesame Noodles!

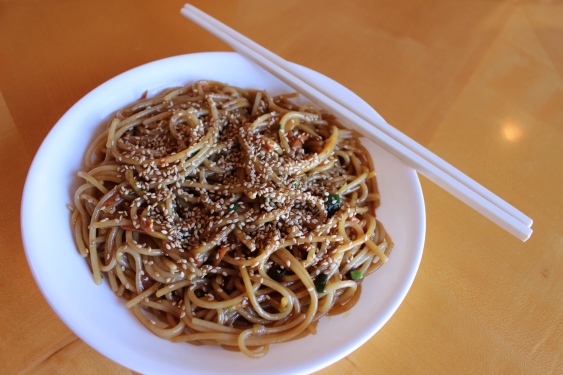
sesame noodles

About a year ago, I discovered my love for sesame oil. I love it. It makes me sad that I had never tried it earlier. I could have been living a whole life full of sesame oil. Anyway…this recipe brings together my favorite things: noodles, sesame oil, and soy sauce. Man I love Asian noodle dishes; I could live off Asian noodle dishes. This one is one of my favorites, and I make it all the time. The flavors are just so amazing! But I won’t waste time talking about it, let’s just get right to the recipe!

What you’ll need:
(As with a lot of my recipes, I made this just for myself so these amounts are only for one serving)

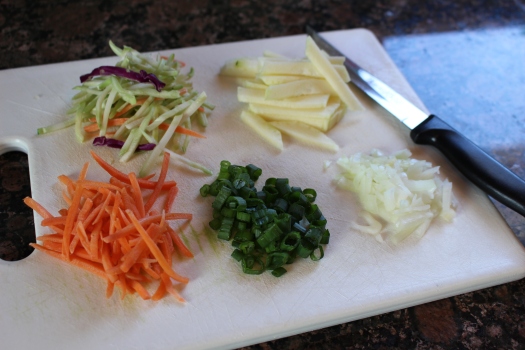
veggies

  • about 4-6 oz brown rice spaghetti
  • little handful of carrots
  • little handful of broccoli slaw
  • 1-2 thin slices of onion, diced
  • 3-4 sliced of zucchini, cut into strips
  • 1 green onion, sliced
  • about 2 teaspoons minced garlic
  • about 2-3 tablespoons sesame oil (use more or less, depending on your love for sesame oil)
  • as much soy sauce as your heart desires (which for me, is a lot)
  • feel free to add any protein you like—I’ve used chicken which is really good in this
  • sesame seeds for topping

How to make it:

  1. Cook your pasta according to the package.
  2. Add 1 tablespoon sesame oil to a wok or pan. When it’s hot, add your veggies (excluding the green onions and garlic) and cook until soft (if you’d like, you can add a little soy sauce to the veggies for it to absorb the flavor). Make sure you don’t start this step too early, otherwise you might overcook your veggies while you’re waiting for the pasta to be done (yes, I know this from experience). Just plan your time wisely so your veggies and pasta are done at about the same time.
  3. Once your pasta is cooked and drained, add the garlic and green onions to the wok and sauté for another minute or so. Then, add your pasta to all your veggies and add as much sesame oil and soy sauce as desired.
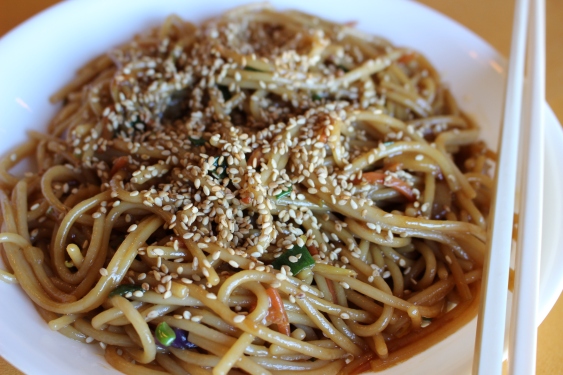
  4. Put it into a bowl, top with sesame seeds, and enjoy!

This recipe is so yummy. It’s definitely one of my go-to meals, and it’s so easy! It’s one more pasta recipe in my pasta arsenal (which, by the way, is very full). For having such simple ingredients, this dish packs a whole lot of delicious flavor. And as usual, feel free to personalize as you like and use different veggies and proteins. I’m so happy that me and sesame oil were brought together. I hope you all enjoy this recipe as much as I do! 🙂

sesame noodles

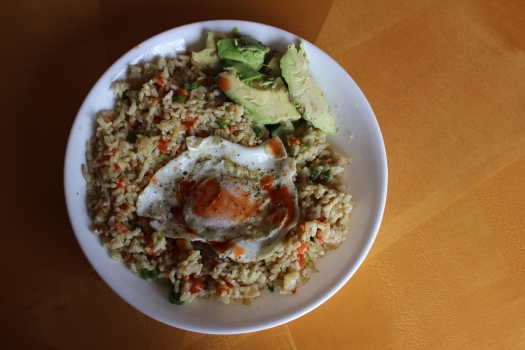
Recipe: Egg & Avocado Rice Bowl!

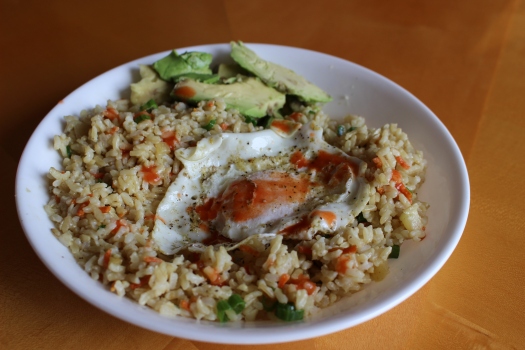
egg avocado rice bowl

I was desperately in need of a new easy lunch option. Not that I ever get tired of pasta (pretty much my everyday choice), but I needed something a little different. That’s when this recipe came in, and I kind of fell in love with it. I have Pinterest to thank for bringing me and this bowl together, and I adjusted it just a little bit. It’s so ridiculously delicious, and it has kind of a brunch-y vibe because of the nice fried egg on top. The flavors just go so well together, and oh my goodness I just love it so so much!

What you’ll need:
*Note that I only made enough for just me, so if you’re making this for more than one person increase amounts.

  • 1 cup Minute Brown Rice and 1 cup water for cooking (or you can use leftover rice, whatever rice you’ve got will work)
  • 1 chicken bouillon cube (only if making rice)
  • 1 tsp red wine vinegar
  • 1-2 green onions, thinly sliced
  • 1 large egg
  • about 1/2 an avocado, sliced
  • a little handful of carrots, chopped small
  • a little handful of zucchini, chopped small
  • about 2 tbsp olive oil
  • salt and pepper
  • hot sauce (optional)

How to make it:

  1. (if necessary) Add your bouillon cube to 1 cup of water and cook your rice until all the liquid is absorbed.
  2. Sauté your carrots and zucchini in about 1 tbsp olive oil, until soft.
  3. Add red wine vinegar, carrots, zucchini, and green onions to your rice, then add salt and pepper to taste.
  4. Put a little more olive oil in the pan you cooked the veggies in, and crack your egg into it. Make sure you season with salt and pepper, and cook it to your liking (it’s best if the yolk is still nice and runny).
  5. Put your rice into a bowl, top with the egg, avocado, and hot sauce, and bask in the glory of this unbelievably tasty dish!

Not only is this delicious, it’s just so dang pretty! I mean look at it.

egg avocado rice bowl

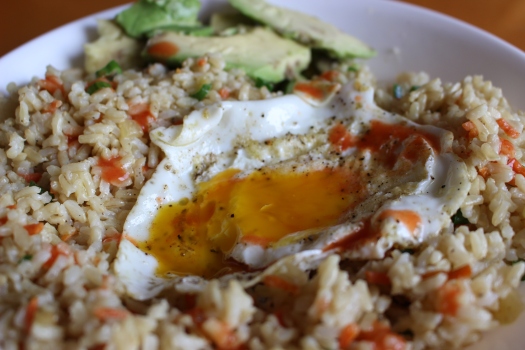
Mmmm…and when you break the yolk…

egg avocado rice bowl

Wow. It’s just so nice to look at. It’s amazing. I’m pretty obsessed with this recipe right now, if you couldn’t tell. After the egg is on top and the yolk is broken, I like to cut it up into little pieces so I can mix it all together and get a little bit of the egg in each bite. The hot sauce is a nice added touch; it gives it just the bit of kick that this needs. The avocado makes it a little creamy and a little more heavenly. I could go on and on about this. But instead, I’ll let you all give it a try yourselves.

Do you have a favorite lunch recipe? Leave it in the comments!

Recipe: Superbowl Buffalo Chicken Dip!

It’s Superbowl Sunday! For some people, they may be getting excited for the big game. For me, I’m getting excited for all the food I’m going to eat tonight. In fact, the only games I care about today are the Kitten Bowl and the Puppy Bowl (because who wouldn’t love watching cute little fluffy animals run around a tiny football field?) Unfortunately this year, I will not be making this dip because I’m trying to eat healthy (a good-in-the-long-run but sad-right-now decision). But that doesn’t mean you all can’t enjoy this delicious dip! Here you can see our Superbowl setup from last year, featuring the buffalo dip right in the front, as well as nachos, shrimp cocktail, a veggie platter and more:

Superbowl food table
And yes, this was just for me, my mom, and my dad. We’re hungry people.

This idea actually came from a recipe for buffalo chicken jalapeño poppers, but instead of stuffing jalapeños with the mixture, I just put it in a  bowl and made it a dip. So here’s how you make it!

What you’ll need:

  • 8 oz softened cream cheese
  • 1/2 cup of bleu cheese dressing (I don’t like bleu cheese so I use ranch dressing)
  • 1/4 cup hot sauce (I use Frank’s Red Hot Buffalo Wing Sauce)
  • 12.5 oz can of chicken, flaked
  • 1 1/2 cups shredded Mozzarella

How to make it:

  1. Preheat your oven to 375°
  2. Put all ingredients in a bowl (reserve 1/2 cup of Mozzarella for topping) and combine well. Make sure you break up all the cream cheese, otherwise you’ll have big chunks of it in the dip and, I don’t know about you, but I don’t want that.
  3. Transfer to a baking dish and top with remaining cheese. Bake for 15-20 minutes, or until brown (if you’re in a hurry or you’re just impatient like me you can just bake it for a couple minutes and then broil it the rest of the way until it’s brown and bubbly).
  4. Serve with tortilla chips or veggie sticks and enjoy!

To me, this dip is the star of the game. It’s the MVP. Who wants to watch a football game when you can have your face in Buffalo Chicken Dip all night?? My dad also loves this dip, so for the past two years I’ve made it for his fantasy football draft. I’m told that it’s a hit with his buddies. I’m not sure why something football related has to happen for me to make this, but I’m really gonna have to start making it year round. So I hope you enjoy watching the Superbowl today, or if you’re like me, I hope you enjoy the food, commercials, and halftime show.

Recipe: Peanut Noodles!

peanut noodles

This recipe combines two of my favorite things: noodles and peanut butter. I got the recipe from Food Network, and it’s so creamy and flavorful and just plain delicious! I love to sauté some vegetables and combine them with my favorite brown rice noodles and this amazing peanut sauce. And the sauce is literally one of the easiest things to make! All you have to do is throw some stuff in the blender and turn it on. This is one of my go-to recipes, and it’s definitely one to keep in your recipe lineup.

What you’ll need:

  • 12 oz brown rice spaghetti (my favorite is Tinkyada)
  • handful of matchstick carrots
  • handful of broccoli slaw (which has broccoli, red cabbage, and carrots, so you could always just chop up some broccoli and cabbage)
  • a few slices of zucchini, cut into strips
  • about a tablespoon of minced garlic
  • 1-2 chopped green onions
  • crushed peanuts, for topping
  • (you can add any meat you want; most of the time I just use veggies, unless I have some leftover grilled chicken or something like that that’s easy to toss in)

(For the sauce)

  • 1/2 cup creamy peanut butter (I like Jif)
  • 8 oz coconut milk
  • 1-2 tablespoons of honey
  • 1-2 tablespoons lime juice concentrate
  • 1/4 cup soy sauce
  • 1 tablespoon garlic paste
  • red pepper flakes (optional)

How to make it:

  1. Cook your pasta according to the directions on the package
  2. While your pasta is cooking, sauté your carrots, broccoli slaw, and zucchini in a wok or pan in a little bit of canola oil
  3. Just before you add your pasta, put your green onions and garlic in the wok and cook for another minute or so. Then add in your pasta to the veggies
  4. For the sauce, put all your ingredients in the blender and blend it all up until it’s nice and creamy and smooth. Taste and adjust ingredients as desired
  5. Add as much sauce as you’d like to the pasta and veggie combo, and mix it all together
  6. Plate it up and top with the crushed peanuts

And there you go! You have delicious Peanut Noodles that will make your taste buds as happy as can be. This is such an easy recipe. I barely have to do any work, because most of the vegetables I use are the ones that come in bags and are already pre-cut. Literally the only things I have to cut up are the zucchini and green onions, and that takes no time at all. I even have a jar of minced garlic, so I don’t have to chop that up either. And of course you can add whatever vegetables you have in your house! I am obsessed with the flavor of this sauce, and the crunch of the peanuts on top just makes it even better. I could eat this all day every day.

The best thing about the peanut sauce in particular is you don’t just have to use it on pasta. I’ve used it in the past as a dip for an avocado summer roll (courtesy of Wegman’s). You could also use it to dip veggies in. Or as a sauce for chicken, fish, or shrimp. You could even try it as a salad dressing. I almost always have leftover sauce, so you will definitely have the opportunity to experiment with its different uses. Any way you eat it, it will be a creamy, delicious delight.

peanut noodles

Recipe: Crockpot Chicken Taco Chili!

snow

When you’re snowed in with blizzard conditions, everyone wants a nice warm bowl of something comforting. For us this weekend, that bowl was full of Crockpot Chicken Taco Chili! We got about two feet of snow, so were desperately in need of warmth. I got the idea for this recipe from Skinnytaste.com, but changed a couple things according to what we actually had in our pantry. It was different from your typical chili, mostly because the chicken is shredded instead of ground, and the taco seasoning gives it a little bit of a different flavor. We always love a Crockpot dinner in our house because all you have to do is pop some stuff in the pot, turn it on, and dinner is ready for you in the evening! It was so delicious, easy, and most importantly, warm!

What you’ll need:

  • 24 oz (3-4) boneless skinless chicken breasts
  • 1 small onion, chopped
  • 1 15.5 oz can kidney beans
  • 1 15.5 oz can Cannellini beans
  • 1 15.5 oz can black eyed peas
  • 1 29 oz can tomato sauce
  • 1 4 oz can chopped green chiles
  • 1 packet taco seasoning (I used Old El Paso)
  • 1 tablespoon chili powder

How to make it:

  1. Combine beans, onion, green chiles, tomato sauce, chili powder and taco seasoning in a slow cooker and combine well
  2. Add the whole chicken breasts and completely cover them. Cook on low for 8 to 10 hours or high for 4 to 6 hours (we did it on high because we didn’t start making it early enough)
  3. 30 minutes before serving, take the chicken out and shred it. Put your chicken back in the slow cooker and stir it all together to cook for the last couple minutes. When it’s done, scoop it into a bowl, add your favorite toppings and enjoy!

crockpot chicken taco chili

This chili was so easy and so so yummy! I topped mine with cheddar cheese, sour cream, green onions, and some chipotle hot sauce. My mom opted for diced tomatoes instead of hot sauce. When we were all topping our chili, my mom and I got into a bit of a presentation war to see who could make their chili prettier. As much as I hate to admit it, I think she might’ve won (although I argue that she tried way too hard).

crockpot chicken taco chili

Me vs. Mom

The nice thing about this chili is you can put whatever kinds of beans or additional ingredients you want. We used those three kinds of beans because they were all we had, but you could use black beans, pinto beans, whatever you like! You could also add corn, or put the diced tomatoes we topped with into the chili, or add some peppers. You also don’t have to just eat the chili out of a bowl; you can serve it over rice or even as a dip for some tortilla chips. No matter how you enjoy it, it will be delicious and will keep you warm! I can’t wait to use up our leftovers. 🙂

In the meantime, we will continue to dig ourselves out of the snow!

IMG_0854

Recipe: Tuna Casserole!

This is one of my very favorite recipes, mostly because it’s one of the only things I can make completely by myself with no help whatsoever. (It’s also my mom’s favorite because it means she doesn’t have to cook dinner). And it’s so easy! All of the ingredients are things that I almost always have around the house, and you can substitute in whatever you like! Instead of peas, you can use your favorite vegetable. Instead of tuna, you can use chicken or turkey. Instead of mozzarella, you can use cheddar. Instead of cream of mushroom, you can use cream of chicken. Literally so many possibilities! So here ya go:

What you’ll need:

tuna casserole ingredients

  • 16oz brown rice pasta (my very favorite pasta is the Tinkyada brand)
  • 2 18oz cans of gluten free cream of mushroom soup
  • 2 6oz cans of albacore tuna
  • 8.5oz can of sweet peas (I usually prefer to use about a cup of frozen peas but I didn’t have any)
  • 2 cups of mozzarella cheese
  • about 1/4 cup of parmesan cheese
  • about a tablespoon or so of breadcrumbs, for topping
  • salt, pepper, garlic powder, and onion powder to taste
  • a few drops of gravy master

How to make it:

  1. Preheat your oven to 375°
  2. Cook your pasta in a large pot according to the package. While it’s cooking, flake your tuna.
  3. After your pasta is done, heat the cream of mushroom soup in the same pot. Add a few drops of gravy master (until it’s a light brown color), and add salt, pepper, garlic powder, and onion powder to taste.
  4. After the soup is hot and starts to bubble, add your tuna, peas, and 1 1/2 cups of mozzarella, half of the parmesan, and then your cooked and drained pasta. Combine well.tuna casserole
  5. Pour the mixture into a 9 x 13 inch pan and spread it so thats the top is flat and even. Top with the rest of the mozzarella and parmesan, as well as the breadcrumbs.
  6. Bake for 15 mins, and then broil on high until it’s brown and bubbly and crispy on top.
tuna casserole

Before & after

This casserole is SO good! The first time I made it was actually at my aunt’s house when she showed me how to make it, and I just kept making it ever since. Like I said before, the best thing about this is that you can put whatever you have in your fridge in this. Anything will work!

I hope you try it and love it as much as I do 🙂